45/ Downloading and Using Programs with the CTX ExChange Software
When I opened the graphics of the ExChange2 software I was a bit intimidated. Once I saw how simple and intuitive it was–it became second nature. First install the software from the disc and register.
Open up the program and source a program fine to download. I will be bringing as many files as can be found to my site:
http://clivesgoldpage.com/ under: “CTX 3030 Programs
This file will be placed in your “Downloads” folder.
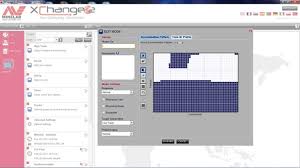
On the right you will see a file titled: “File”. This is the “landing strip” for anything you want to bring in. When you click on “File” an icon opens up in the grey strip above–a square with an arrow in it–indicating “Upload.” Click on this icon and you will be asked to select a file–a Minelab (MLF) file. Look around for your file and double click on it. The program will then be placed in the “File” area. From there you can drag and drop it either into the “All” folder or into any of the “Collection” folders that you can chose to create. To create a “Collection” click the plus sign in e book at top left. This will bring up a set of choices as to how you will name, colour code and select an icon for this folder. Mine are: “Gold” and “Inland”.
Once you have brought in the programs you want to use you are ready to transfer them to the CTX. To do this unscrew the USB port on the CTX. Then insert the supplied cord into both the CTX’s USB port and the one on your PC or laptop. Momentarily, the detector will show at the top left–above “All”. The CTX will hold 9 programs, so to bring in new ones some may have to be deleted. To do this click on the CTX file and you will see al of the installed programs listed. Drag and drop the unwanted one to “Recycle”. These can still be restored later.
From “All” or “File” drag and drop any programs you want to install to the CTX area. To complete the install, go to the right bottom corner of your computer screen and click the upwards arrow to show items in the “Tray” . There will be a small icon of a finger drive. When you hover the cursor over it–it will say: “Safely Remove Hardware and Remove Media”. Click on this icon and the CTX will be visible as connected. Then click on this and the CTX will be ejected from your system. To complete the program install turn the CTX off. It will show that it’s downloading programs and shut off automatically when done. Be sure to thoroughly inspect the threads of the USB cap before securely replacing it. See the section above on securing this cap properly. You are now ready to hunt with your new CTX 3030 programs. Additional sources of CTX 30309 programs to try will be given in the Appendix of this book.
Each file can then be recalled and edited by clicking on the small “pencil and paper” icon in the right hand corner of each search program file. This will bring up all of its features and discriminate patterns to be edited. This is much easier than trying to make changes in the field.
All files can also be exported to be shared by e-mail or posted on “Facebook.” As discussed above, I’ve had good success downloading and testing custom programs from around the world to refine ones for my specific purposes–finding gold in the water.
The ExChange software also acts as a storage for your “GeoHunt” “Waypoint” and “Findpoint” files and these can be found under “All” and moved to where you want to store them.
From: “A Practical Guide to Finding Gold, Silver & Coins with the Minelab CTX 3030” by Clive James Clynick 
Leave a Reply
You must be logged in to post a comment.